EMC is sometimes termed the study of secondary effects that are ignored in college curricula. This investigation hinges on subtle effects mostly ignored during EMI testing.
Certification of aircraft to the high intensity radiated field (HIRF) environment in part involves comparing rf current levels coupled to aircraft cables from an electromagnetic field to levels bulk cable-injected during equipment-level qualification. The process is sometimes termed low-level swept cw testing (Carter 1990).[1] As in other aspects of the correspondence between electromagnetic field-to-wire coupling and bulk cable injection (BCI), this works best when cables are electrically short. As cables become electrically long, aspects of the difference between the distributed field coupling and the lumped element BCI coupling manifest themselves as non-idealities. A solution to one such problem – uncertainty due to standing waves – is discussed in this article.
Bulk cable injection (BCI) type requirements such as MIL-STD-461 CS114, RTCA/DO-160 section 20 rf conducted susceptibility, IEC 61000-4-6 and others exist because of shortcomings in radiated susceptibility/immunity testing particularly at lower frequencies where cables are electrically short (Javor 1997). The limits in these requirements are based on a simple algorithm computing the correspondence between radiated field intensity and the resultant conducted cable stress (Javor 1997). These algorithms predict average current on a matched transmission line, but cannot predict standing wave patterns and amplitudes when a cable is not a matched transmission line.
Normally this is not a major issue because standing waves don’t significantly alter the average coupled current/potential over the entire cable length, and it is the average that counts, at least on a shielded cable, through the shield transfer impedance. But there is one qualification scenario where the relationship between coupled current from an electromagnetic wave and that induced using BCI has to match up very closely, and standing waves are a potential problem. This is when aircraft are certified or cleared for operation against a high intensity radiated field (HIRF) environment.
In qualifying an aircraft for HIRF exposure, the aircraft is illuminated by a low-level electromagnetic field, and coupled currents on selected cables are measured. The coupled current, scaled to the actual threat level, is compared to the connected equipment BCI level of qualification. If the measured and scaled current due to field illumination is higher than the qualification level, the equipment must be retested at the higher level (Carter 1990). So it is critical here to ensure that the lumped element bulk cable injection test gives similar results to the distributed coupling from an electromagnetic wave.
Background
In the world of HIRF qualification, MIL-STD-461 and RTCA/DO-160 assume cables to be 5 cm above a ground plane, and that results in a field-to-wire coupling efficiency of 1.5 mA per Volt/meter when the cable is at least one-half wavelength long, assuming plane wave illumination with the vectors lining up for maximum coupling efficiency (see Figure 1).
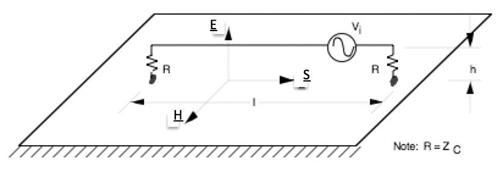
Everything works well if the cable-under-test (CUT) is either electrically short or a transmission line terminated in its characteristic impedance as in Figure 1, but the typical case is anything but that. Most HIRF certification focuses on circuits with flight- and/or safety-critical functions. These are typically not only shielded, but often carry an overbraid, with a 360 degree peripheral termination to aircraft structure, or to the face of an avionics enclosure, which amounts to the same thing on a conventional metallic aircraft. Here then we have a case of ultimate mismatch: a CUT with characteristic impedance around 300 Ohms, terminated in a milliohm impedance to ground, and with very low resistance in the shield material, leading to standing waves. We expect significant standing waves, with current maxima at either end of the cable at frequencies high enough to allow for that. Coincidentally, we place the current monitoring probe, whether for measuring coupling from the electromagnetic field or that induced by a BCI clamp, within 5 cm of the cable end, precisely where a current maximum can occur during illumination.
The entire issue of standing waves and disparities between field-to-wire coupling was debated back in the 1990s (Perini 1993, 1995-1, 1995-2), (Trout 1996) and (Javor 1997). The upshot is that, for a shielded cable, it is only necessary for a BCI technique to capture the worst-case average stress coupled by an electromagnetic field. But greater fidelity is needed for HIRF clearance.
Now if the EM-wave illumination results in precisely the same standing wave pattern as when undergoing BCI testing, all is well. But that assumes that the effect of inserting a probe and/or clamp on a cable does not materially affect the results. This is about the inserted impedance when a probe or clamp is placed around a cable. We normally ignore that effect, but it is the purpose here to investigate it.
First, a little test and measurement philosophy. Typically it is highly desirable that the act of measurement not disturb the measured quantity. This is most likely to be achieved with a low-inserted impedance probe. But since the BCI test method forces the use of a near 50 Ohm inserted-impedance injection device at higher frequencies, it becomes necessary to compare and contrast the effect of low and high impedance devices, and perhaps compromise the purity of the EM-field coupled current measurement in order to achieve the more important aim of accurate field-coupled vs. BCI level comparisons.
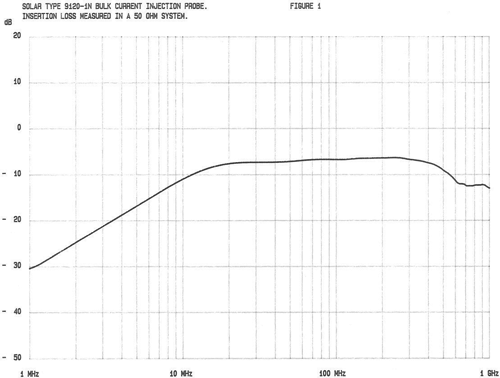
A current probe is characterized by its transfer impedance (ZT dB Ohms), which is the ratio of the output voltage to the current on the wire around which it is clamped. An injection clamp is characterized by its insertion loss ( IL dB), which is the ratio of its input power compared to the power dissipated in one of the 50 Ohm loads in the calibration fixture in which it is placed. As a result of how it is defined, IL is always a negative value, and conservation of energy alone says it cannot exceed -3 dB. The mismatch between the 50 Ohms driving impedance and the calibration fixture 100 Ohm load impedance contributes another decibel, so that -4 dB represents lossless performance. A highly efficient probe has 5 dB insertion loss, and many hover between 5 – 7 dB over much of their useful frequency range.
Because the fixture is the same for probes and clamps, and a clamp can be used as a probe, it works out that insertion loss is related to transfer impedance like this:
ZT dB Ohms = IL dB + 34 dB Ohms
Further, the impedance inserted in a cable by the action of placing a probe or clamp around it is the transfer impedance divided by the turns ratio. The turns ratio is simply the number of windings around the probe/clamp toroidal core, because the other winding is just the wire through the window, which is one turn.
Zinserted (dB Ohm) = ZT dB Ohms – 20 log (turns ratio)
The typical probe has a transfer impedance from well below 1 Ohm to about 5 Ohms, with turns ratios from as high as 20 on low frequency probes to maybe 2 or 3 on higher frequency probes. And the typical injection clamp used at high frequencies is a single turn device with an insertion loss of less than 6 dB, resulting in a transfer impedance approaching 30 dB Ohms and therefore an inserted impedance of the same magnitude.
In the testing described below, a 1 Ohm transfer impedance probe was used inserting no more than 1 Ohm in a cable. Information on the turns ratio was not forthcoming, but we know that the inserted impedance is at or below 1 Ohm. Also an injection clamp inserted 30 dB Ohms. Relevant plots are shown in Figures 2a and 2b. Note that the 30 dB Ohms is a real or dissipative impedance representing the 50 Ohm load on the clamp coax connector reflected across the turns ratio, in parallel with clamp core losses. This lossy type of impedance will detune a resonance. The effect of placing these different inserted impedances at current maxima on the CUT is characterized herein.

Investigation Outline/Summary of Results
In order to demonstrate the problem and solution, this investigation performs the following steps:
- Illuminates a cable with a plane-wave from 2 – 200 MHz
- Measures the average coupled current to that cable with
- no probe installed
- a low impedance current probe installed
- a high impedance injection clamp installed
The above steps demonstrate no effect on average coupled current due to probe or clamp installation. The next step illuminates the cable at a single frequency:
- Measures coupled current at current probe position and average current using both low impedance probe and high impedance clamp. A 12 dB difference in current at the probe location is seen, while there is no difference in average current.
- Measures average coupled current using BCI drives that equal the 12 dB apart currents measured with probe and clamp under the plate. Predictably, the average currents are also 12 dB apart, and the average current that is closest to that under the plate is when the current was measured with the high impedance clamp used as a current probe.
The above steps and results demonstrate that the use of the high-inserted impedance clamp as a probe during the HIRF low-level swept cw measurement does not perturb the measurement, and results in much closer agreement between said measurement and equipment-level BCI test results. This is where the concept of critical damping is a useful analogy. Achieving correct damping is a familiar concept to electrical, mechanical and even civil engineers (think the Tacoma Narrows bridge failure of 1940). Here we seek to add an optimal amount of dissipation to a high “Q” system such that what we measure better tracks the average system response instead of a localized peak response.
Measurements
Field-to-Wire Coupling
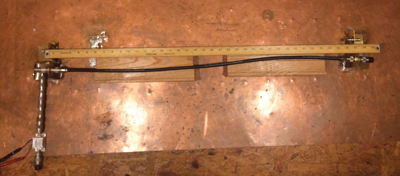
In this investigation, a parallel plate establishes the requisite field illuminating a cable 36 inches (90 cm) long, 5 cm above a ground plane. The CUT is shown in Figure 3, and is 50 Ohm RG-8 terminated in N-connectors which are connected to 50 Ohm loads on both ends. One end is a dummy load, the other end is a 50 Ohm input low noise amplifier (LNA) with 30 dB gain. A 50 Ohm transmission line was selected so that the coupled potential at either end would be the same throughout and thus be a measure of the average current coupled to the outer shield, through the transfer impedance of the shield. RG-8 was selected in particular because it is single-shielded and therefore has higher transfer impedance yielding a higher level signal to measure, and also because the shield material is just pure copper, as opposed to coated wires with lower transfer impedance. N-connectors were chosen for being threaded and maintaining low transfer impedance over the uhf range of this test, whereas a bayonet type connector would have leaked and compromised test results at just the points at which current maxima are to be expected.
Most measurements were made at 133.6 MHz, a frequency selected by placing a Fischer Custom Communications F-65 probe at the cable center point and sweeping from 100 – 200 MHz looking for a null, or current minimum. That defines the lowest frequency at which the cable is resonant: it isn’t computationally a half-wavelength long, but is acting like it. The lowest frequency is useful in minimizing parasitic effects, of which there were many in this suite of measurements. Above 100 MHz, the set-up was very easily disturbed by a hand placed in the vicinity of the probe or the probe-connected cable. Hence, the probe cable termination point at the edge of the ground plane to allow fixed cable geometry between set-ups (seen in later figures).
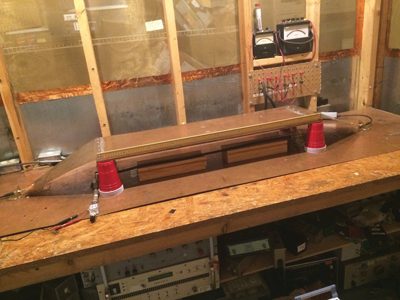
For electromagnetic wave illumination purposes, the cable is placed within a parallel plate transmission line, as shown in Figure 4a. This plate has a 90 Ohm characteristic impedance and uses 50 – 90 Ohm adapters at both ends. Figure 4b shows plate performance vs. frequency, again indicating that the lowest resonant frequency is the optimum choice.

We measure coupled current when driving the plate at a set level at a set frequency or over a frequency span, using the low impedance probe and high impedance clamp, and then comparing both the measured current and the potential coupled to the center conductor.
Measured current is the current at the place the probe is positioned, which is chosen to be a current maximum, while the coupled potential is a measure of the average current along the length of the cable, with the constant of proportionality being the RG-8 shield transfer impedance. This was approximately -30 dB Ohm at 133.6 MHz, an estimated measurement because, once the cable is electrically long, this method loses accuracy for the exact same reason as the subject of this investigation: standing waves.
The next measurement was core potential (potential between RG-8 center conductor and ground) when the cable was illuminated by the plate field. We don’t expect (or want) differences here, because the 0.4” diameter RG-8 suspended 2”above ground represents a characteristic impedance of 360 Ohms and the insertion of 50 Ohms in series with that is about 1 dB change. In Figure 5, three traces are shown, representing no probe or clamp around cable, the 1 Ohm transfer impedance F-65 around the cable, and the near 50 Ohm Solar Model 9120-1N around the cable, these latter two at the same place along the cable, near one end.
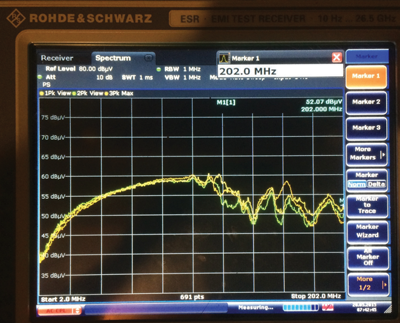
Figures 6a and b show the placement the F-65 and the Solar Electronics Model 9120-1N with a measured 30 dB Ohm transfer impedance. Figures 7a and b show the measured currents with just the probe in place, and also the clamp. The clamp reduces the resonant current by 12 dB.


Detuning the resonance isn’t much help if placement of the clamp also reduces the total or average coupled current. We need just the right amount of detuning, without inserting so much impedance that the overall current is reduced. Figure 5 has so indicated on a broadband basis; Figure 8a shows the effect of the probe and clamp placement on the potential coupled to the inner conductor at 133.6 MHz, which is proportional to average current through the shield transfer impedance (-30 dB Ohm). Figure 8b can be interpreted using the equation below to mean that average coupled current is 55 dBuA.
I dBuA = Vmeasured dBuV – 30 dB – ZT RG-8 cable dB Ohm

The next order of business is to use the Solar Model 9120-1N injection clamp as a probe instead of the combination F-65 current probe and clamp as a de‑tuner.
Figure 9a shows the set-up, and Figure 9b shows the measured current.

The last thing to check is the coupled potential when the clamp alone is in place and the current induced on the cable is that in Figure 9b, as shown in Figure 9c.
BCI Measurements
Average current is in reasonable agreement under the plate using both high and low inserted impedance probes and clamps. It is time to look at how well bulk cable injection simulates the above results. Figure 10 shows the set-up.
The first task is to drive the Model 9120-1N hard enough to induce the same current as measured by the F-65 when the plate illuminated the cable. This is shown in Figure 11a. When this current has been induced, the coupled potential is measured (Figure 11b) and compared to that occurring under the plate. The coupled potential measured in Figure 11b means that the average current is 72 dBuA, which is much higher than was seen under the plate. When the 57 dBuA measured with the Solar 9120-1N under the plate is induced, as in Figure 11c, the resultant coupled potential is very similar to that measured under the plate.
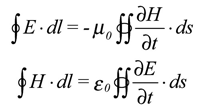
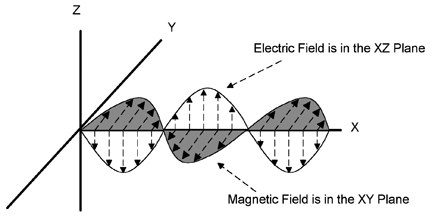

Compare core potentials in Figures 11b and 11d to the 55 dBuV recorded in Figure 8b, which was the same whether the clamp was in place, or just the probe. This is the payoff: using the clamp to monitor current when the cable is plane-wave illuminated yields a measurement that gives core potentials (average current) 2 dB below what is obtained when that current is induced using BCI techniques. However, if only the probe is placed around the illuminated cable, and that current is induced using BCI, then BCI causes 15 dB higher coupling than plane wave illumination. It is clear that the use of a BCI clamp as a pickup probe detunes the resonance without reducing average cable current.
Conclusion
Direct comparison of illuminated cables vs. BCI levels of qualification can have significant errors when a low inserted-impedance probe is placed at a current maximum point during the illumination phase. Use of an injection clamp acting as a current probe during the illumination phase dampens constructive interference and minimizes the error when the cable is electrically long. The conclusion is that use of a BCI clamp as a pickup device is better than a low impedance probe for the purpose of establishing correlation with BCI qualification levels for electrically long, shielded cables.
The author wishes to thank the engineers who took the time to review drafts of this article in advance of publication. Any errors of commission or omission are solely the responsibility of the author.
Endnotes
- Carter, N.J., “The Application of Low Level Swept RF Illumination as a Technique to Aid Aircraft EMC Clearance,” ITEM, 1990
- Javor, K. “On Field-To-Wire Coupling Versus Conducted Injection Techniques,” 1997 IEEE EMC Symposium Record. Austin, Texas.
- Trout, D., “Investigation of the Bulk Current Injection Technique by Comparison to Induced Currents from Radiated Electromagnetic Fields,” 1996 IEEE EMC Symposium, Santa Clara,
p. 412-417. - Perini, J., “Radiated Versus Injected measurements: When Are They Equivalent?”, Proceedings 10th International Symposium on EMC, March 9 – 11, 1993, Zurich, Switzerland,
p. 343-348. - Perini, J., Cohen, L. S., “Radiated Versus Injected measurements: When Are They Equivalent? – Part 2”, Proceedings 11th International Symposium on EMC, March 6 – 8, 1995, Zurich, Switzerland
- Perini, J., Cohen, L. S., “On The Equivalence Of Radiated And Injected Tests”, 1995 IEEE EMC Symposium, 1995, Atlanta, p. 77-80.
 Ken Javor has worked in the EMC industry for over 30 years. He is a consultant to government and industry, runs a pre-compliance EMI testing facility, and curates the Museum of EMC Antiquities, a collection of radios and instruments that were important in the development of the discipline, as well as a library of important documentation. He can be reached at ken.javor @emccompliance.com.
